Aiming the player's gaze through the crosshair sights
The crosshair sights represent the only way in which the player can interact with the game's 3D landscape; you can point the crosshairs at tiles and objects, and then you can interact with them, but that's it. It's a slow process, intentionally, and it really adds to the tension when you're desperately trying to run away from an enemy and have nothing more powerful than a set of crosshairs.
The crosshairs are fairly simple, at least when compared to the rest of the Sentinel's heavy mathematics, but even they get touched by trigonometry. In this article we'll take a look at how the sights are managed and drawn, and how we can convert a simple on-screen cross into a gaze vector that can be followed deep into the 3D game world (see the deep dive on following the gaze vector for plenty more on that subject).
Moving and drawing the sights
-----------------------------
The crosshair sights are managed by a number of routines. We'll explain the more interesting ones below, but here's a list:
- The InitialiseSights routine initialises the variables used to manage the sights, so the sights appear in the middle of the screen. This is called by the CheckForKeyPresses routine from within the interrupt handler when the player presses SPACE.
- The sightsAreVisible variable is updated in CheckForKeyPresses to record whether or not the sights are currently visible.
- The xSights and ySights variables store the on-screen pixel coordinates of the sights, and specifically the position of the top pixel in the sights. This means that the centre of the sights is at (xSights, ySights - 5). The x-coordinate of the top pixel in the sights ranges from 16 to 143 (left to right), and the y-coordinate ranges from 32 to 159 (bottom to top). The sights start out at coordinates (80, 95), with the centre at (80, 90).
- The DrawSights routine draws the sights and the RemoveSights routine removes them. They use the sights pixel byte stash at sightsByte to store the screen pixel bytes behind the sights, so they can be restored to remove the sights from the screen.
- The xSightsStep and ySightsStep variables contain the shape of the sights, for use when drawing and removing.
- The MoveSights, MoveSightsSideways and MoveSightsUpDown routines control the movement of the sights, and trigger a screen pan when the sights move towards the edge of the landscape view.
- The SetSightsAddress routine updated the address variables for the sights when they move into a new character block or row.
- The GetSightsVector routine calculates the angles of the vector from the player's eyes to the sights, so we can follow the gaze vector to see where the player is looking (see the next section below for details).
Most of these routines are fairly obvious. The sights are anchored by the top pixel in the crosshairs, with the centre of the crosshairs being five pixels below that, and the movement routines update the values of xSights and ySights according to the contents of the key logger. As the sights move around they are removed and redrawn, using a pixel byte stash to store the contents of the screen beneath the crosshairs, and if the sights reach the edge of the screen then the movement routines trigger a screen by populating the panKeyBeingPressed with the number of the relevant pan key. This effectively "presses" the pan key, and the scrolling routines will kick into action to scroll the screen, as described in the deep dive on panning and hardware scrolling.
The sightsAreVisible variable enables us to process the movement key presses correctly, so they move the sights when the sights are visible, rather than panning the screen. It also lets us configure the screen panning process so that any screen pans that are triggered by the crosshairs moving to the edge of the screen are always seen through to completion, rather than being aborted if the pan key is released. This is achieved in part 2 of MainGameLoop by checking the value of sightsAreVisible and leaving bit 7 of keepCheckingPanKey clear when the sights are on-screen, so that the DrawLandscapeView routine doesn't care if the player releases the pan key before the drawing process has finished, it will always complete the panning process (unlike with a normal in-game pan).
Perhaps the only slightly surprising aspect of the sights is how they are drawn by the DrawSights routine. The sights are not drawn using sprites, but instead the xSightsStep and ySightsStep tables define a set of 12 steps to follow when drawing the sights, relative to the start position at the top of the sights.
Each step is encoded as an x- and y-coordinate delta, so we step through the design of the crosshairs by starting at the top pixel, i.e. at (xSights, ySights), drawing a single pixel byte of the sights, and then adding the next delta to get to the next coordinate, where we draw another pixel byte of the sights, and so on. You can think of it like using a brush, starting at the top blob in the sights, and moving the brush by each step in the design, dabbing the brush on the screen at each step.
At each step, the current contents of each pixel byte is copied into a pixel byte stash at sightsByte. We then set the relevant pixel for the crosshairs in that pixel byte and poke it into screen memory. Note that the sights are poked directly into screen memory rather than going via a screen buffer; the current screen address of the sights is stored in sightsScreenAddr(1 0), which is set to the correct screen address when the sights are initialised, and is updated by the SetSightsAddress routine as the sights move around the screen.
The steps draw a shape like this, starting at step 0 and showing steps 10 and 11 as A and B:
     00
     11
     22
334455667788
     99
     AA
     BB
Each step is made up of two pixels, one filled (e.g. white) and one transparent, to give a shape like this, where "x" denotes a filled pixel and "." denotes a transparent pixel:
     x.
     x.
     x.
x.x.x.x.x.x.
     x.
     x.
     x.
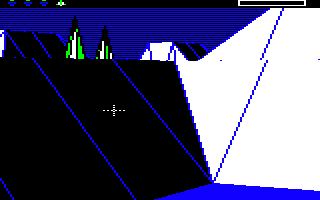
The colour of the sights changes depending on the background, so that it is visible at all times. Here's an example of the sights in the palette for landscape 0000, straddling a detail in the landscape:

The crosshair pixels are white by default, but you can see that the crosshair pixels on the left go black when against the white background, as otherwise they would disappear. In the same way, the white pixels go black when against a green background, as that stands out more clearly:

We achieve this effect by taking the existing screen pixel byte and setting the crosshairs pixel to either colour 1 or colour 2, depending on the original current colour in that pixel. Specifically, we draw the sights in colour 2 when the background is colour 0 or 1, and we draw the sights in colour 1 when the background is colour 2 or 3.
To map this to the physical colours in landscape 0000, we paint the sights pixels in white (colour 2) when the background is blue (colour 0) or black (colour 1), and we paint the sights pixels in black (colour 1) when the background is white (colour 2) or green (colour 3). This ensures that the sights are visible wherever they are on-screen, irrespective of the current screen contents.
Calculating the gaze vector for the sights
------------------------------------------
The sights have a purpose beyond looking pretty on-screen, and that purpose is to provide the gameplay routines with a gaze vector from the player's eyes, through the sights and into the landscape beyond. By following the gaze vector, we can work out what the player is looking at, and therefore how they can interact with the game world; for example, if they are looking through the sights at an empty tile, they might be able to create an object there.
The vector from the player's eyes to the sights is calculated in the GetSightsVector routine as follows:
   vectorYawAngle = (xSights / 8) - (10 0) + (objectYawAngle,X 0)

   vectorPitchAngle = ((ySights - 5) / 16) + (3 32) + (objectPitchAngle,X 0)
Let's break this down to see how it works, starting with the yaw angle calculation:
- xSights / 8 takes the screen pixel x-coordinate in xSights and divides it by 8 to convert it into yaw angles (see the deep dive on the projection system for details).
- (10 0) represents half a screen width, as the screen is 20 yaw angles wide, so subtracting (10 0) from the sights yaw angle makes it relative to the centre of the screen rather than the left edge.
- (objectYawAngle,X 0) is the yaw angle of the player (as GetSightsVector is always called with X set to the object number of the player).
So we effectively take the yaw angle from the left edge of the screen to the sights, and subtract (10 0) to make it relative to the centre of the screen, i.e. relative to the direction in which the player is facing (i.e. relative to the player's yaw angle). We can then add this relative yaw angle to the yaw angle of the player to get the yaw angle of the gaze through the sights.
Now for the pitch calculation:
- (ySights - 5) / 16 takes the screen pixel y-coordinate for the top of the sights in ySights and subtracts 5 to get the y-coordinate of the centre of the crosshairs. It then divides this by 16 to convert it into pitch angles (see the deep dive on the projection system for details).
- (3 32) is a correction term that appears to be made up of two parts:
- To make the pitch angle relative to the centre of the screen rather than the bottom edge, we need to subtract half a screen height, which is (6 0). This is the vertical equivalent of the subtraction of (10 0) from the yaw calculation above.
- Rather than subtracting (6 0), we actually add (3 32) in the code, which is a difference of (9 32) , or 9.125. So why do we add (9 32) to the pitch angle? I'm not entirely sure, but I think it might be related to the player's eye position being at a height of 0.875 tiles above the tile, rather than being on the tile, so to capture this we need to add to the pitch angle. The player looks down at a pitch angle of -11 (as all objects are spawned with this "dipped headlight" setup), and 0.875 * 11 = 9.625, which is pretty close to the value of 9.125. But it isn't exact and I'm not entirely sure of this part, so this aspect is on the to-do list to clarify and remains a bit of a mystery...
- (objectPitchAngle,X 0) is the pitch angle of the player.
So we effectively take the pitch angle from the bottom edge of the screen to the centre of the sights, and add 3.125 to make it relative to the direction in which the player is facing (i.e. relative to the player's pitch angle). We can then add this relative pitch angle to the pitch angle of the player to get the pitch angle of the gaze through the sights.
We can then pass this vector to the FollowGazeVector to follow the line of sight from the player through the sights, to see what they are seeing. See the deep dive on following the gaze vector for details.